This template enables eCommerce sellers to keep a record of all their orders, including the platform, item details, total price, order shipment, order cancellation requests that they can choose to accept or reject, and etc.
Problem
-
Difficult to manage a large number of orders - This is especially for those sellers that sell their products on various platforms and receive a lot of orders.
-
Difficult to handle when the sellers receive an order cancellation request from buyers – The seller is difficult to trace back to the record of the communication/chat with the buyer which is important for the seller to decide whether want to accept or reject the order cancellation request. This system also allows the sellers to record the details of order cancellation requests.
Objective
- The sellers on eCommerce platforms can manage their orders coming from multiple platforms in a more organized way by using this system.
- The sellers on eCommerce platforms can record the order cancellation request from buyers and decide whether want to accept or reject order cancellation requests by using this system.
Step by step (Configuration)
Information
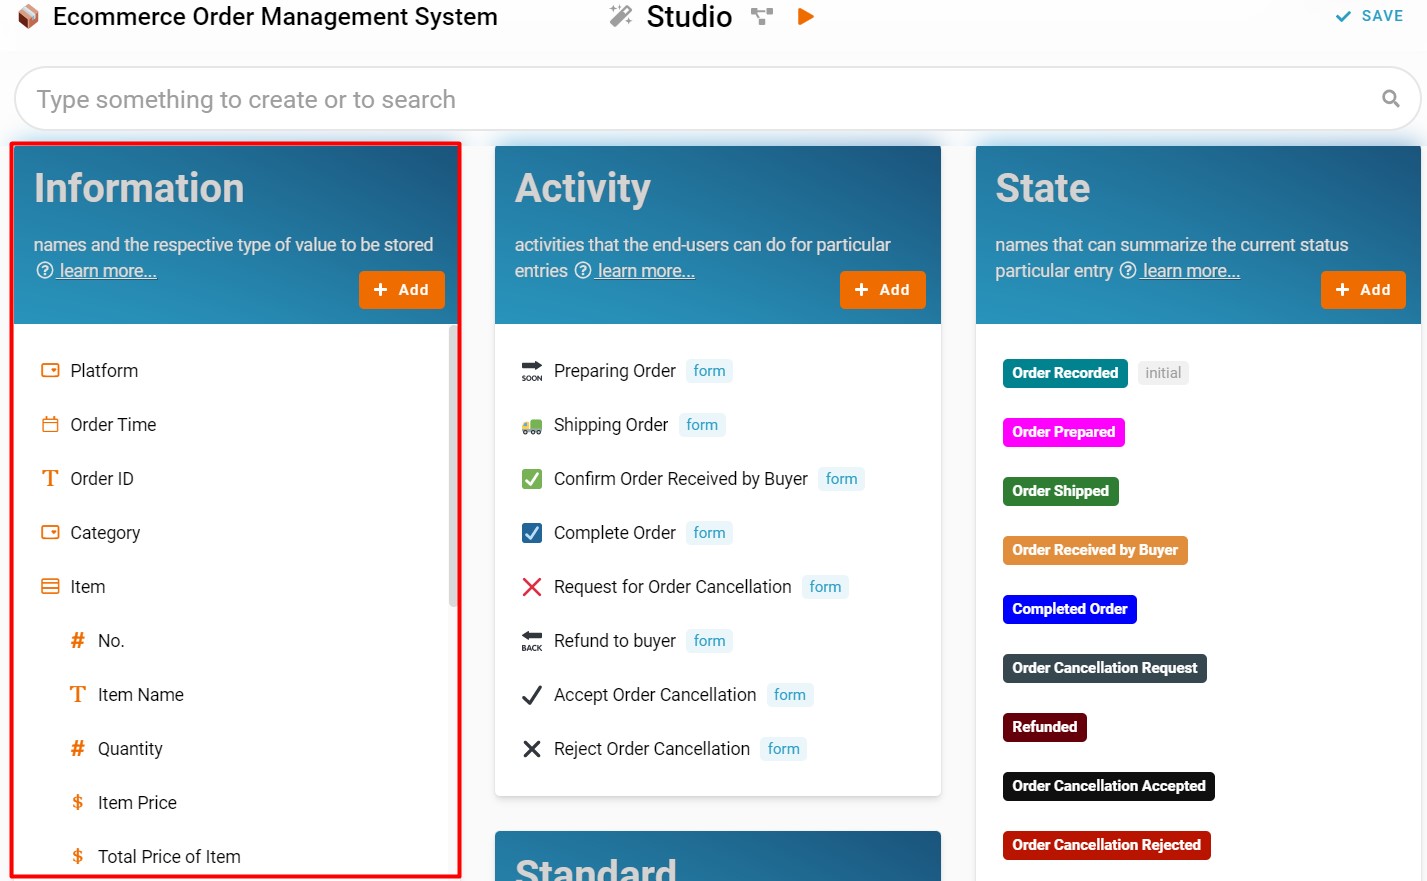
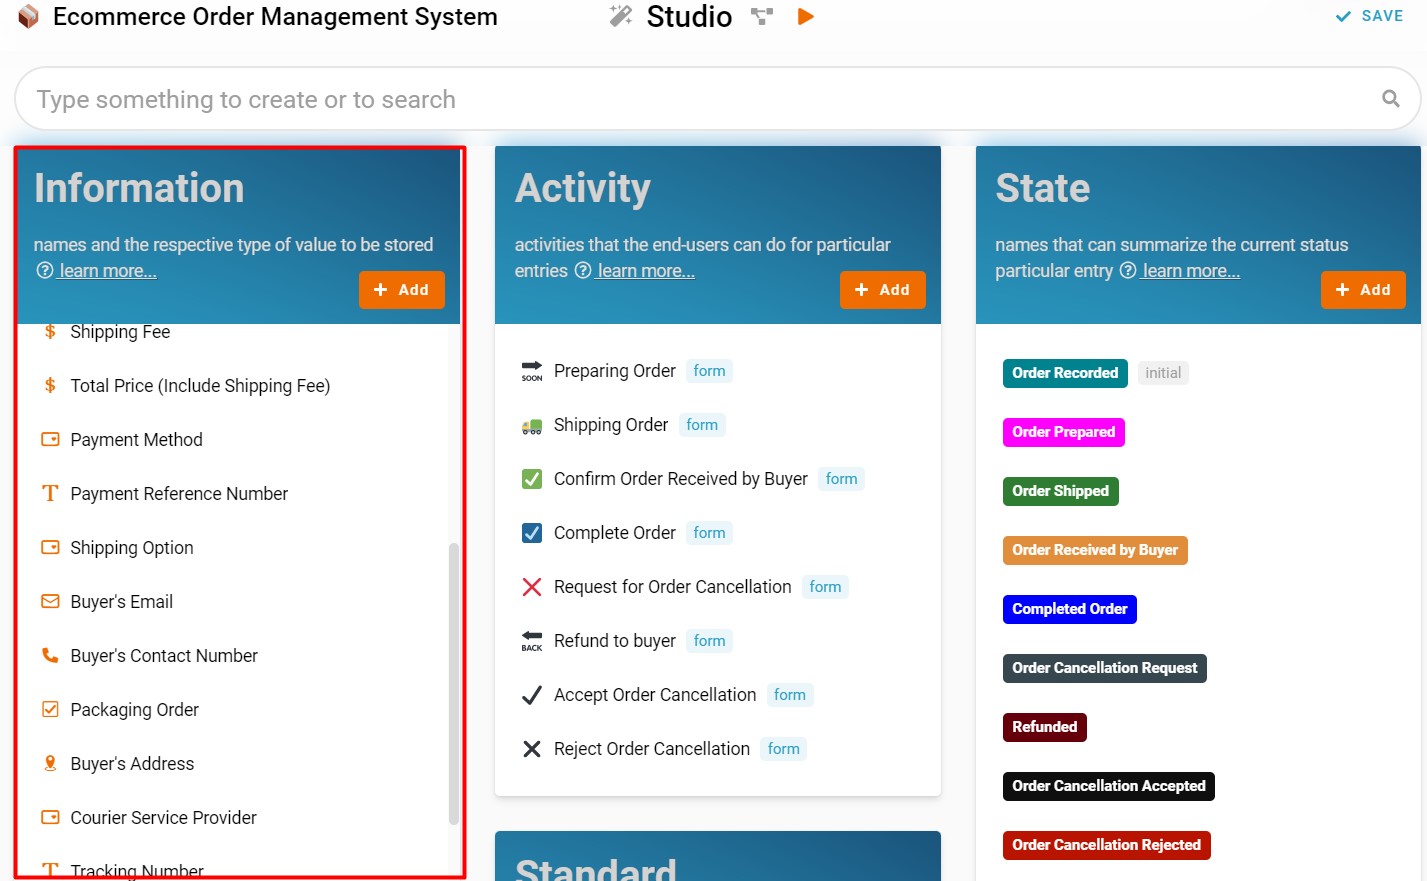
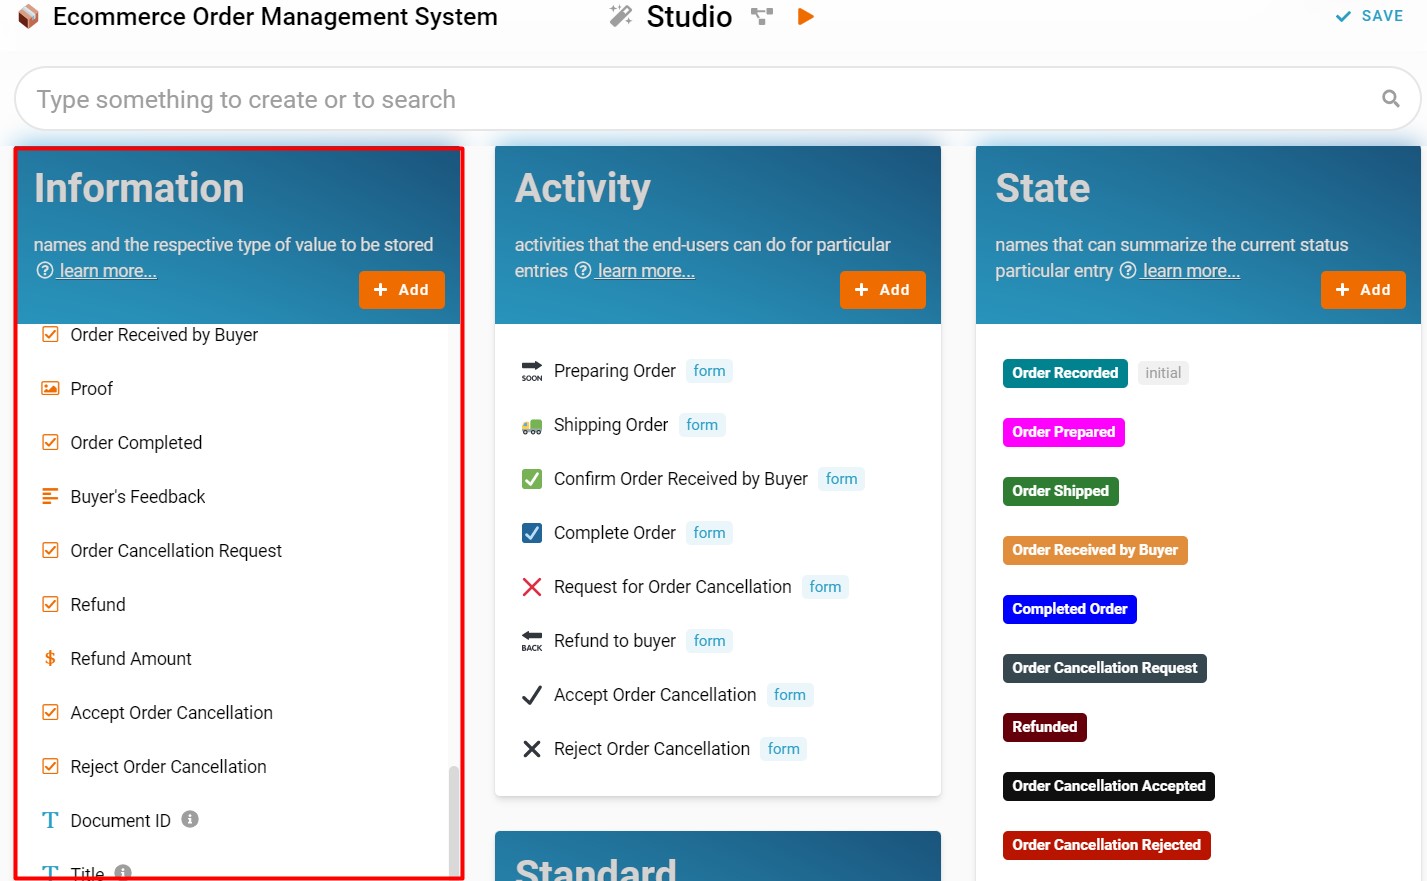
- Recognize and configure all the Information name and type required to create a new entry in eCommerce Order Management System. (Refer Picture 1, Picture 2 & Picture 3):
-
Name: Platform, Information Type: SelectOptions:
- Shopee
- Lazada
- Amazon
- Alibaba
-
Name: Order Time, Information Type: Date Time
-
Name: Order ID, Information Type: Text
-
Name: Category, Information Type: SelectOptions:
- Mobile & Accessories
- Computer & Accessories
- Home Appliances
- Groceries
- Fashion Accessories
- Baby & Toys
- Watches
- Sports & Outdoor
-
Name: Item, Information Type: TableFields:
- No.
- Item Name
- Quantity
- Item Price
- Total Price of Item
-
Name: Shipping Fee, Information Type: Money
-
Name: Total Price (Include Shipping Fee), Information Type: Money
-
Name: Payment Method, Information Type: SelectOptions:
- Cash-on-delivery (COD)
- Credit / Debit Cards
- Online Banking
- Digital wallet / e-Wallet
-
Name: Payment Reference Number, Information Type: Text
-
Name: Shipping Option, Information Type: SelectOptions:
- Local: Standard Delivery
- Local: Economy Delivery (Sea Shipping)
- Local: Self Collection
- Overseas: Standard Delivery
- Overseas: Economy Delivery (Sea Shipping)
-
Name: Buyer’s Email, Information Type: Email
-
Name: Buyer’s Contact Number, Information Type: Phone Number
-
Name: Packaging Order, Information Type: YesNo
-
Name: Buyer’s Address, Information Type: Location
-
Name: Courier Service Provider, Information Type: SelectOptions:
- Pos Malaysia
- GD Express Sdn Bhd
- City-Link Express
- DHL
- Lalamove
- J&T Express
- Shopee Express
-
Name: Tracking Number, Information Type: Text
-
Name: Order Received by Buyer, Information Type: YesNo
-
Name: Proof, Information Type: Image
-
Name: Order Completed, Information Type: YesNo
-
Name: Buyer’s Feedback, Information Type: Multiline Text
-
Name: Order Cancellation Request, Information Type: YesNo
-
Name: Refund, Information Type: YesNo
-
Name: Refund Amount, Information Type: Money
-
Name: Accept Order Cancellation, Information Type: YesNo
-
Name: Reject Order Cancellation, Information Type: YesNo
Activity
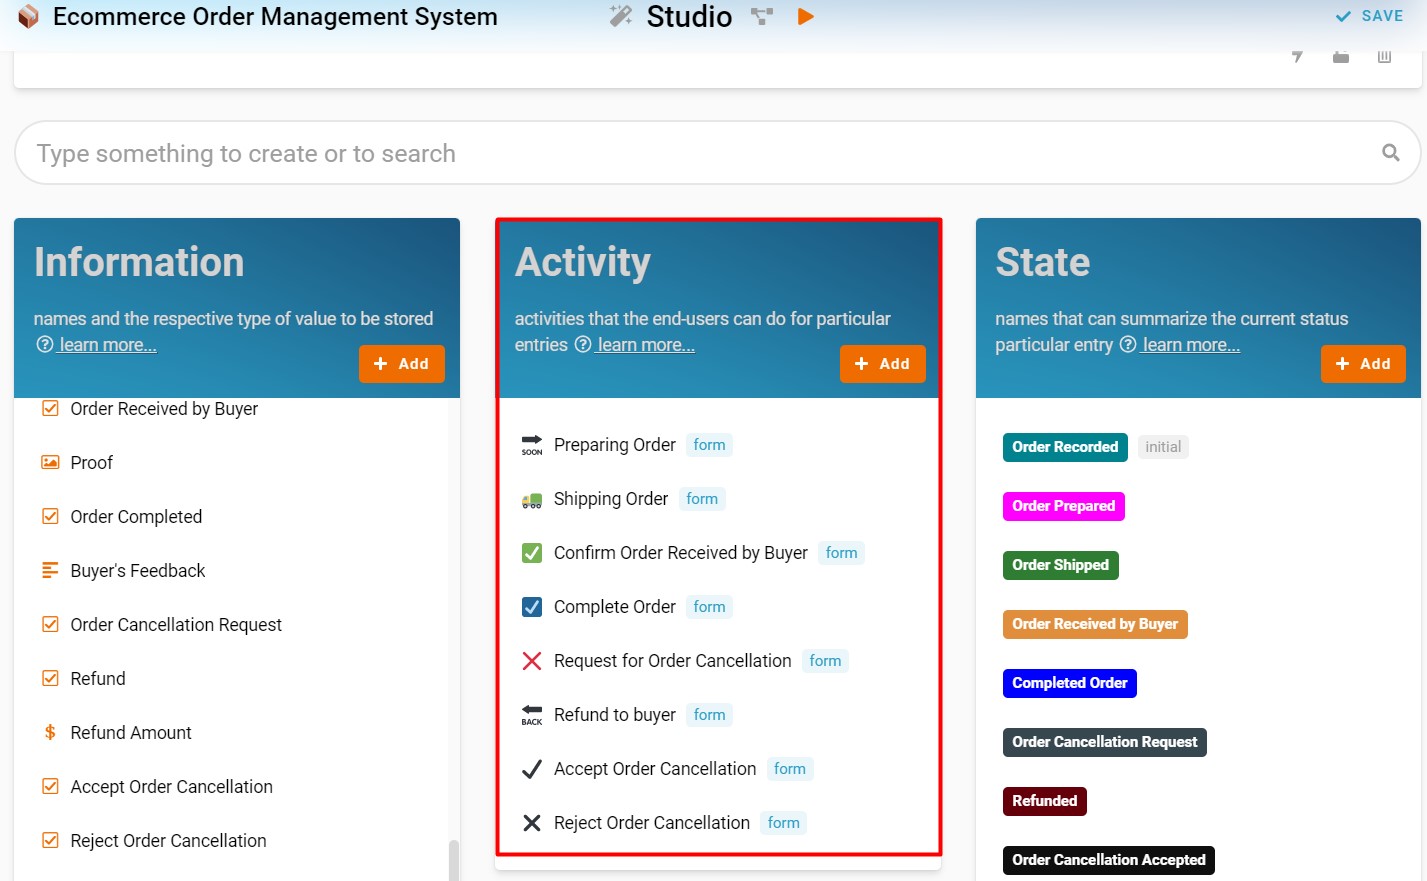
- Recognize and configure all the Activity able to perform to change State (Refer Picture 4):
- Preparing Order
- Shipping Order
- Confirm Order Received by Buyer
- Complete Order
- Request for Order Cancellation
- Refund to buyer
- Accept Order Cancellation
- Reject Order Cancellation
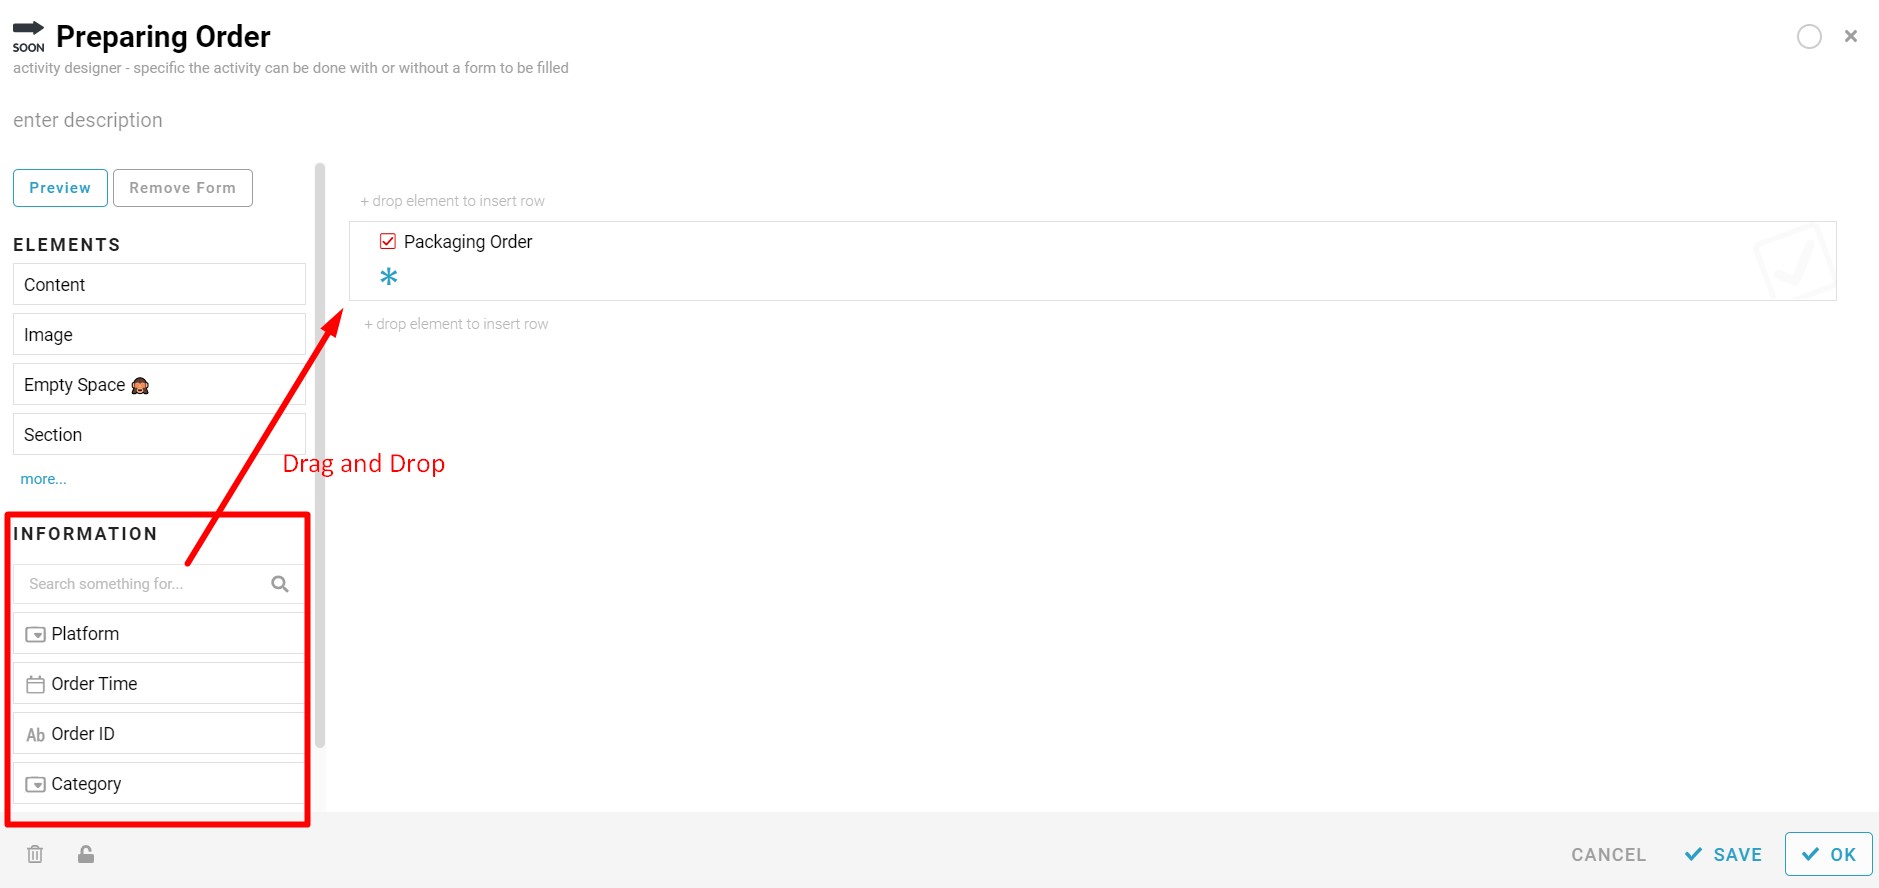
- Drag & drop to design form that consists of the respective Information for each Activity created (Refer Picture 5):
- Preparing Order
- Packaging Order
- Shipping Order
- Buyer’s Address
- Courier Service Provider
- Tracking Number
- Confirm Order Received by Buyer
- Order Received by Buyer
- Proof
- Complete Order
- Order Completed
- Buyer’s Feedback
- Request for Order Cancellation
- Order Cancellation Request
- Refund to buyer
- Item table
- Shipping Fee
- Total Price (Include Shipping Fee)
- Refund Amount
- Refund
- Accept Order Cancellation
- Accept Order Cancellation
- Reject Order Cancellation
- Reject Order Cancellation
- Reject Order Cancellation
State
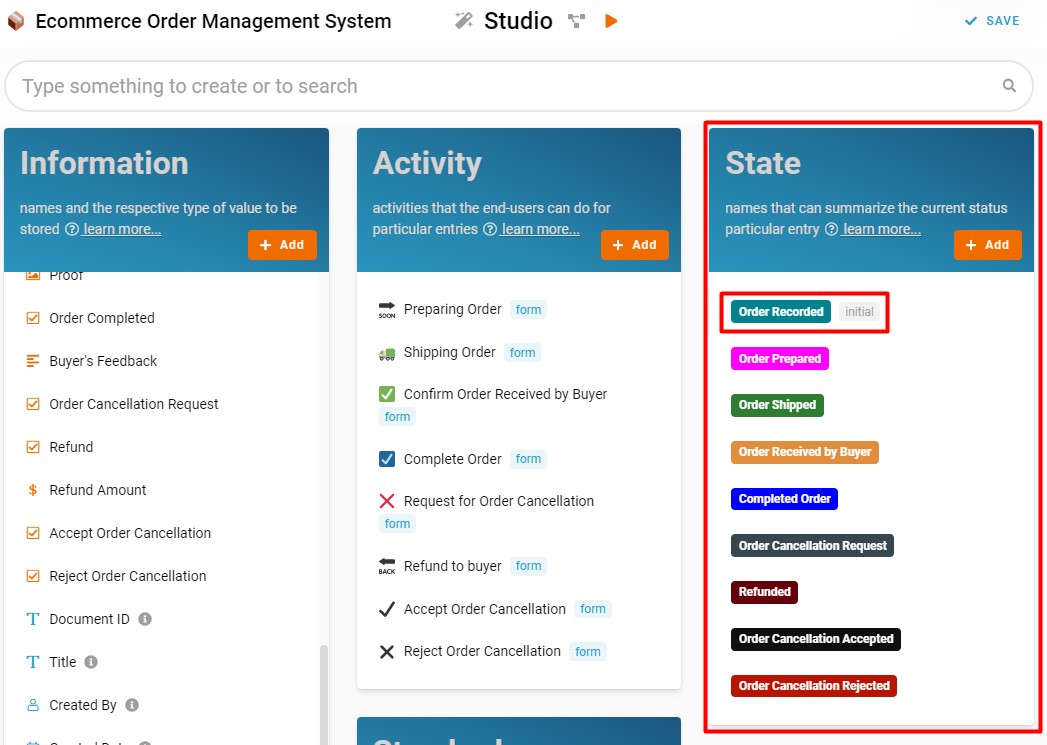
- Recognize and configure all the State in the whole eCommerce Order Management System (Refer Picture 6):
- Order Recorded (make sure there is ‘initial’ grey box beside it, by clicking this state to open the state designer, toggle ‘Initial’, and make sure only one of the states is ‘Initial’.)
- Order Prepared
- Order Shipped
- Order Received by Buyer
- Completed Order
- Order Cancellation Request
- Refunded
- Order Cancellation Accepted
- Order Cancellation Rejected
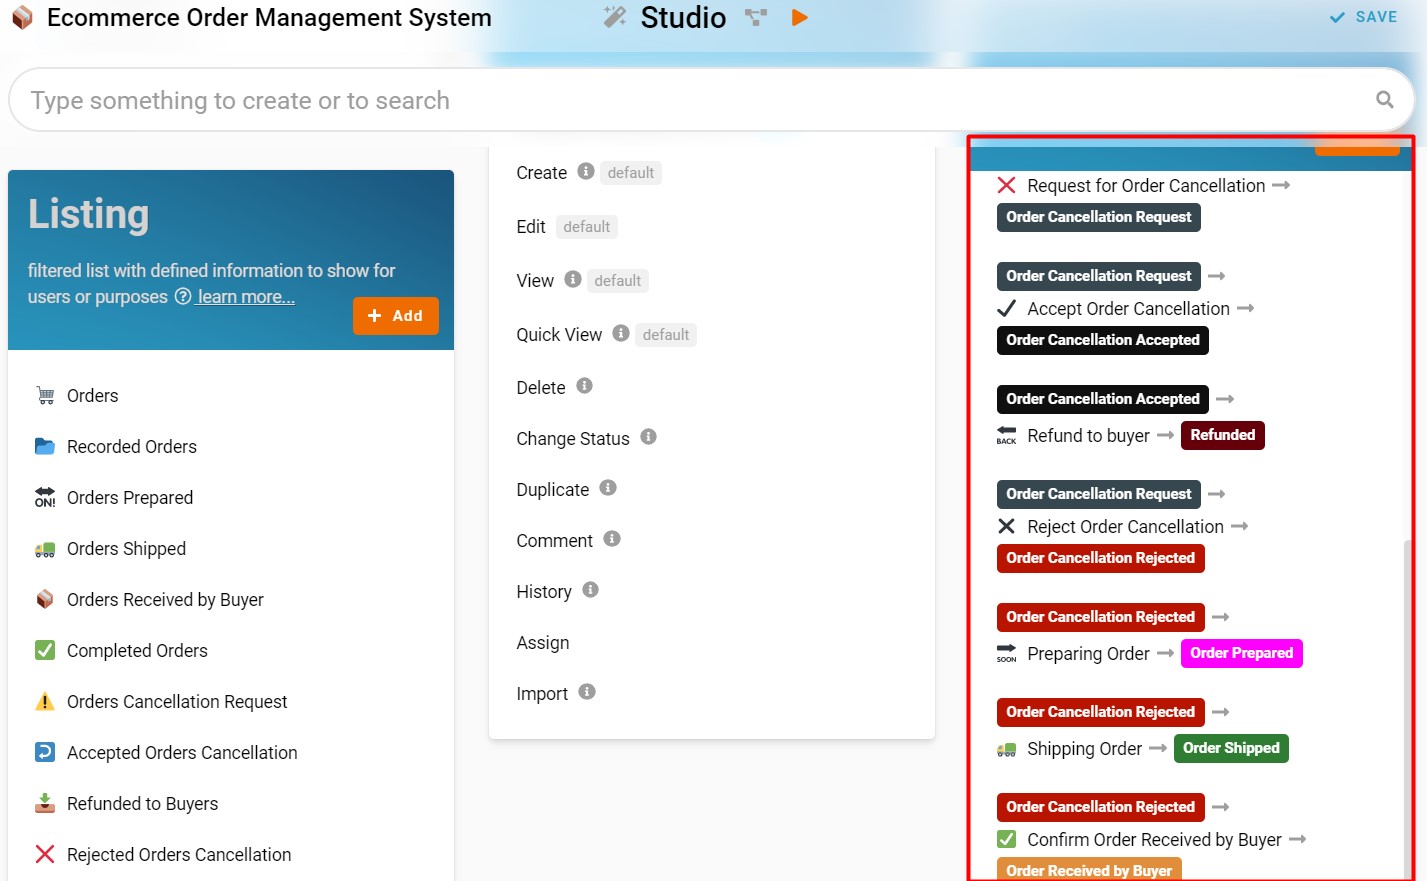
Flow
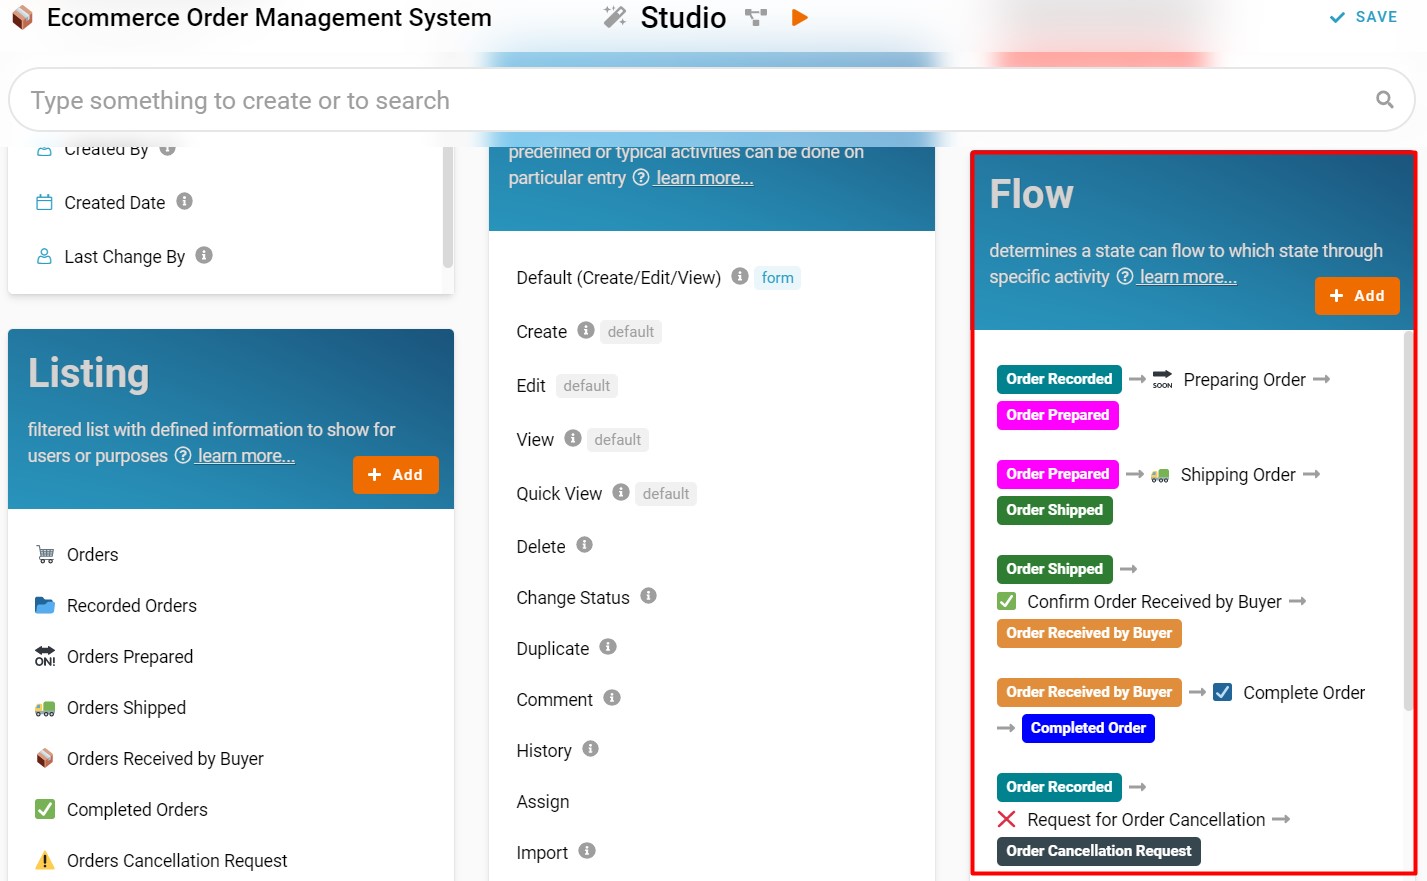
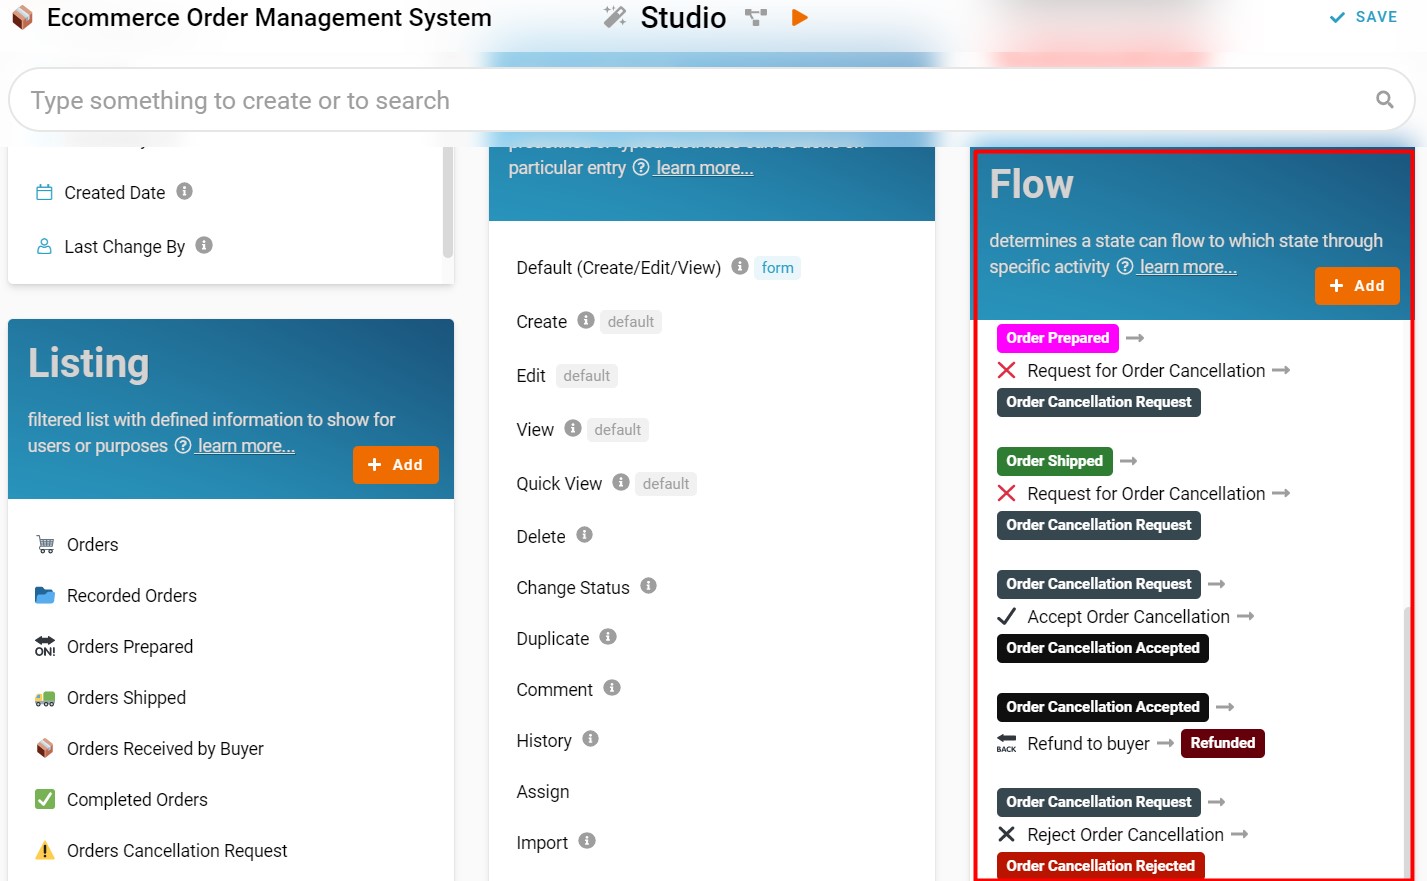
- Configure Flow by determines a state can flow to which state through specific activity and form a reasonable workflow diagram in whole progress (‘From State’ → ‘Activity’ → ‘To State’) – (Refer Picture 7 & Picture 8 & Picture 9):
- Order Recorded → Preparing Order → Order Prepared
- Order Prepared → Shipping Order → Order Shipped
- Order Shipped → Confirm Order Received by Buyer → Order Received by Buyer
- Order Received by Buyer → Complete Order → Completed Order
- Order Recorded → Request for Order Cancellation → Order Cancellation Request
- Order Prepared → Request for Order Cancellation → Order Cancellation Request
- Order Shipped → Request for Order Cancellation → Order Cancellation Request
- Order Cancellation Request → Accept Order Cancellation → Order Cancellation Accepted
- Order Cancellation Accepted → Refund to buyer → Refunded
- Order Cancellation Request → Reject Order Cancellation → Order Cancellation Rejected
- Order Cancellation Rejected → Preparing Order → Order Prepared
- Order Cancelation Rejected → Shipping Order – Order Shipped
- Order Cancellation Rejected → Confirm Order Received by Buyer → Order Received by Buyer
Standard
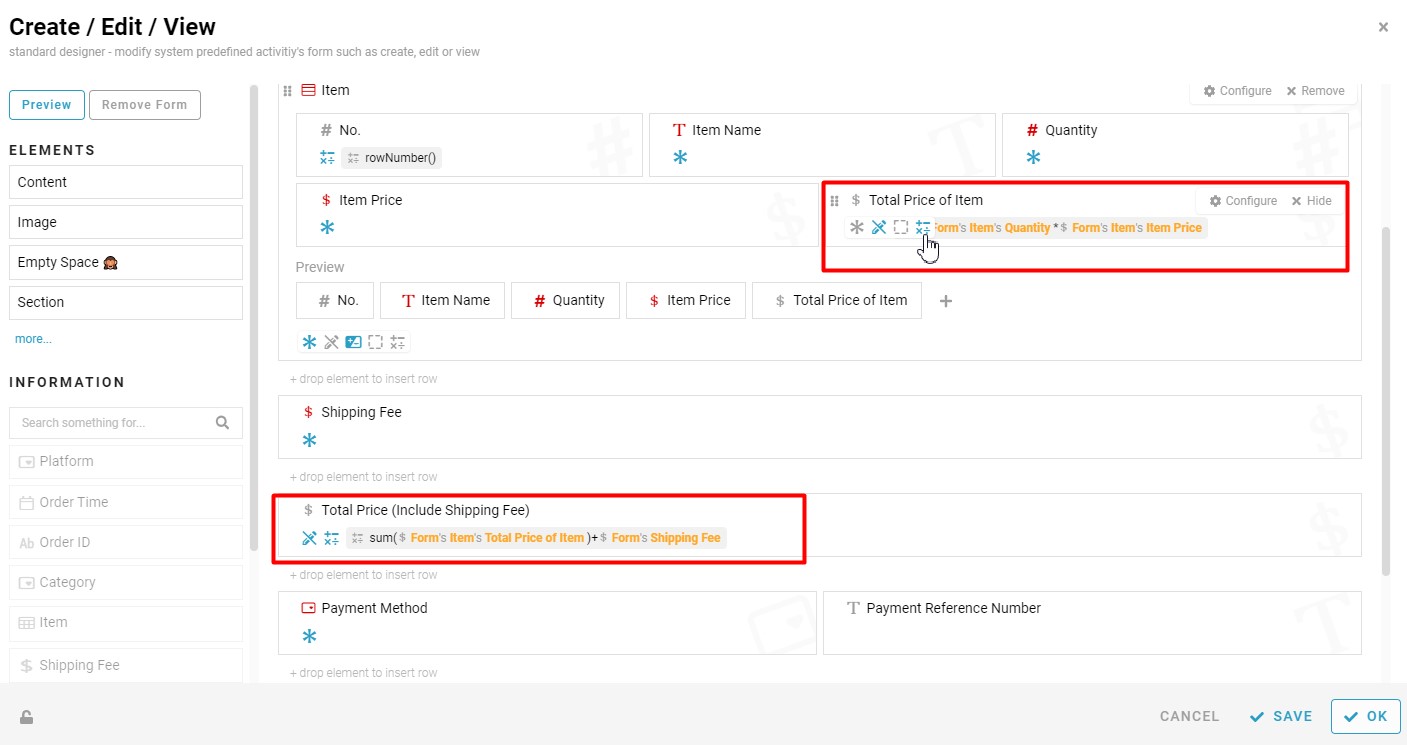
- Based on the selected Standard Activity, design the form with the Information below (Refer Picture 10 & Picture 11):
-
Default (Create/Edit/View)
- Click ‘Default (Create/Edit/View) under Standard.
- Click the grey box area with the message: ‘Wish to have a classification form? Click to customize your form.’.
- Drag the information boxes listed in ‘INFORMATION’ and drop into the form design area.
- Arrange the information boxes according to your preferences.
- Add formula script to ‘Total Price of Item’ in ‘Item’ table to calculate the total price for each item by multiplying its ‘Quantity’ and ‘Item Price (Click the ‘±x÷’ icon to enter the formula, type # to select the information when writing the formula).
- Add formula script to ‘Total Price (Include Shipping Fee)’ to calculate the total price of all item plus the shipping fee (Click the ‘±x÷’ icon to enter the formula, type # to select the information when writing the formula).
- Click the ‘SAVE’ button after done and click ‘OK’ to close the form.

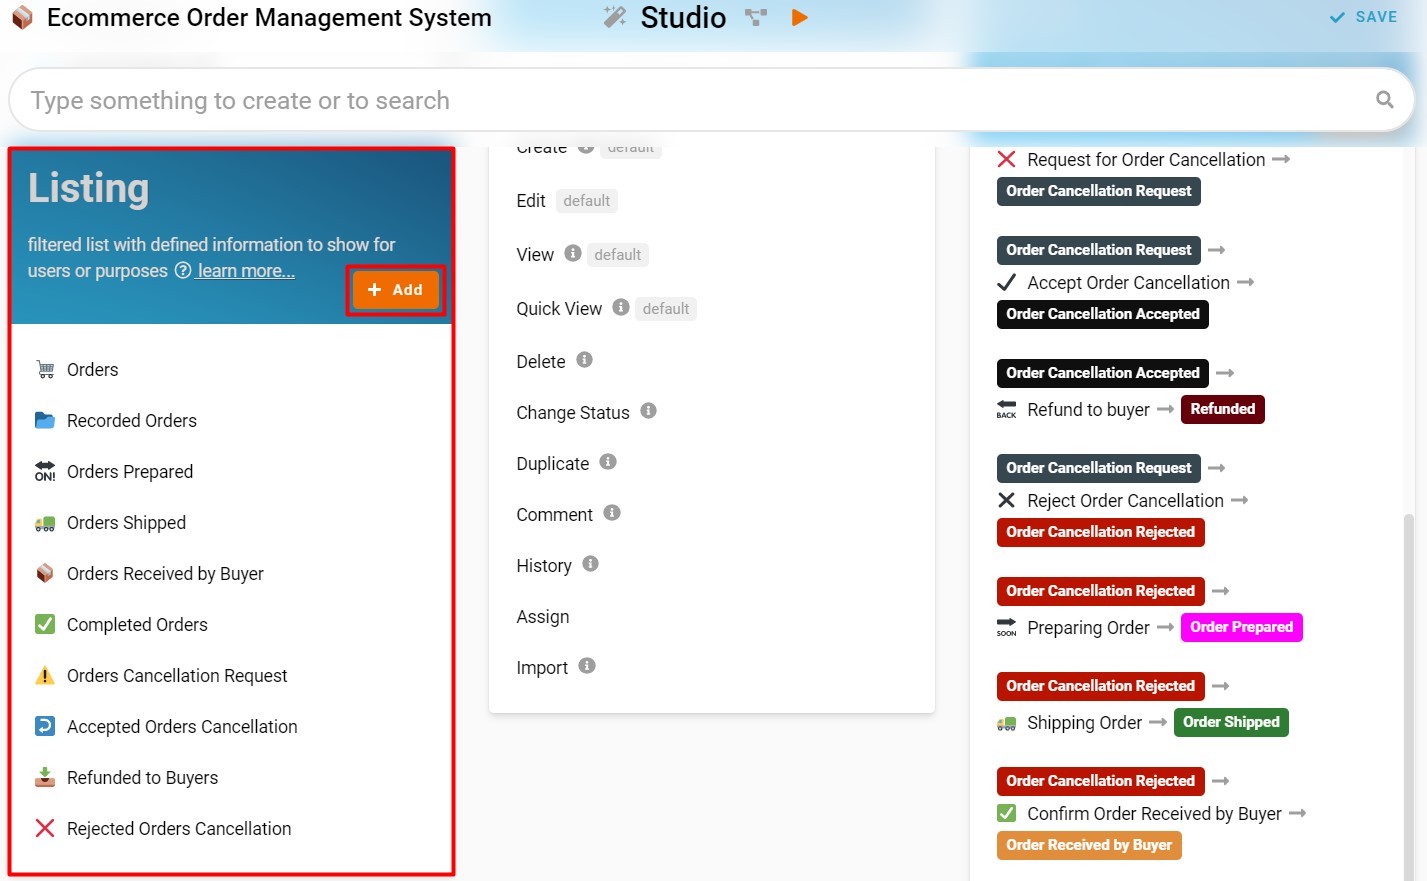
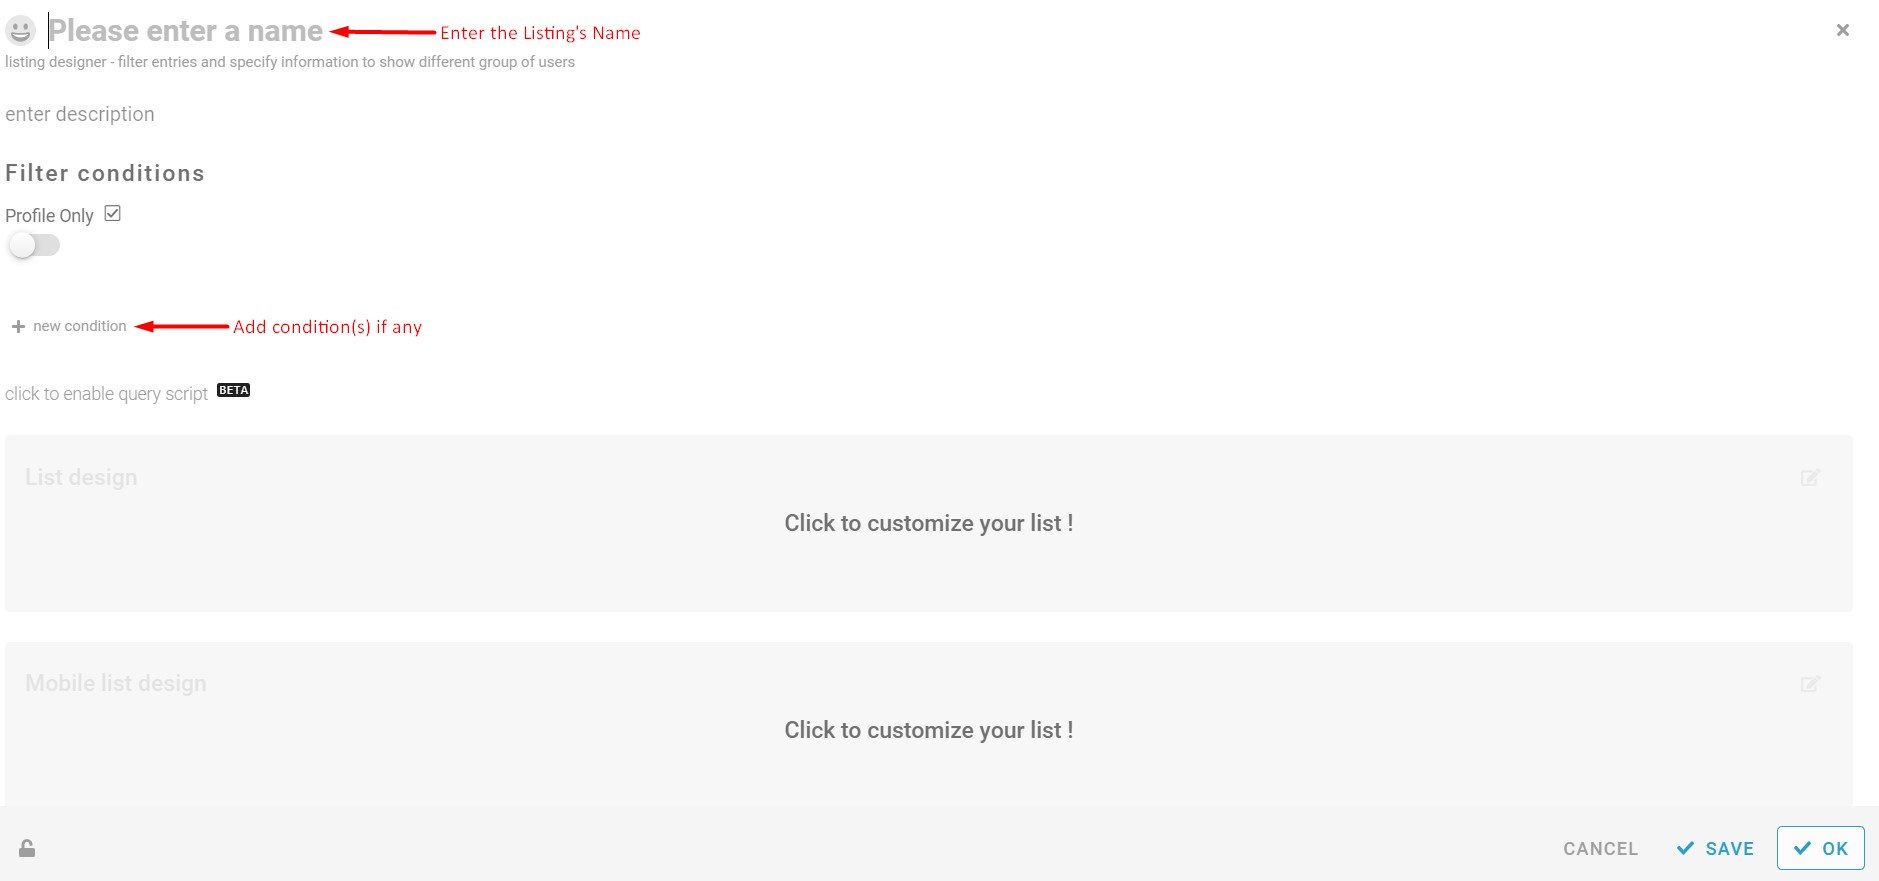
Listing
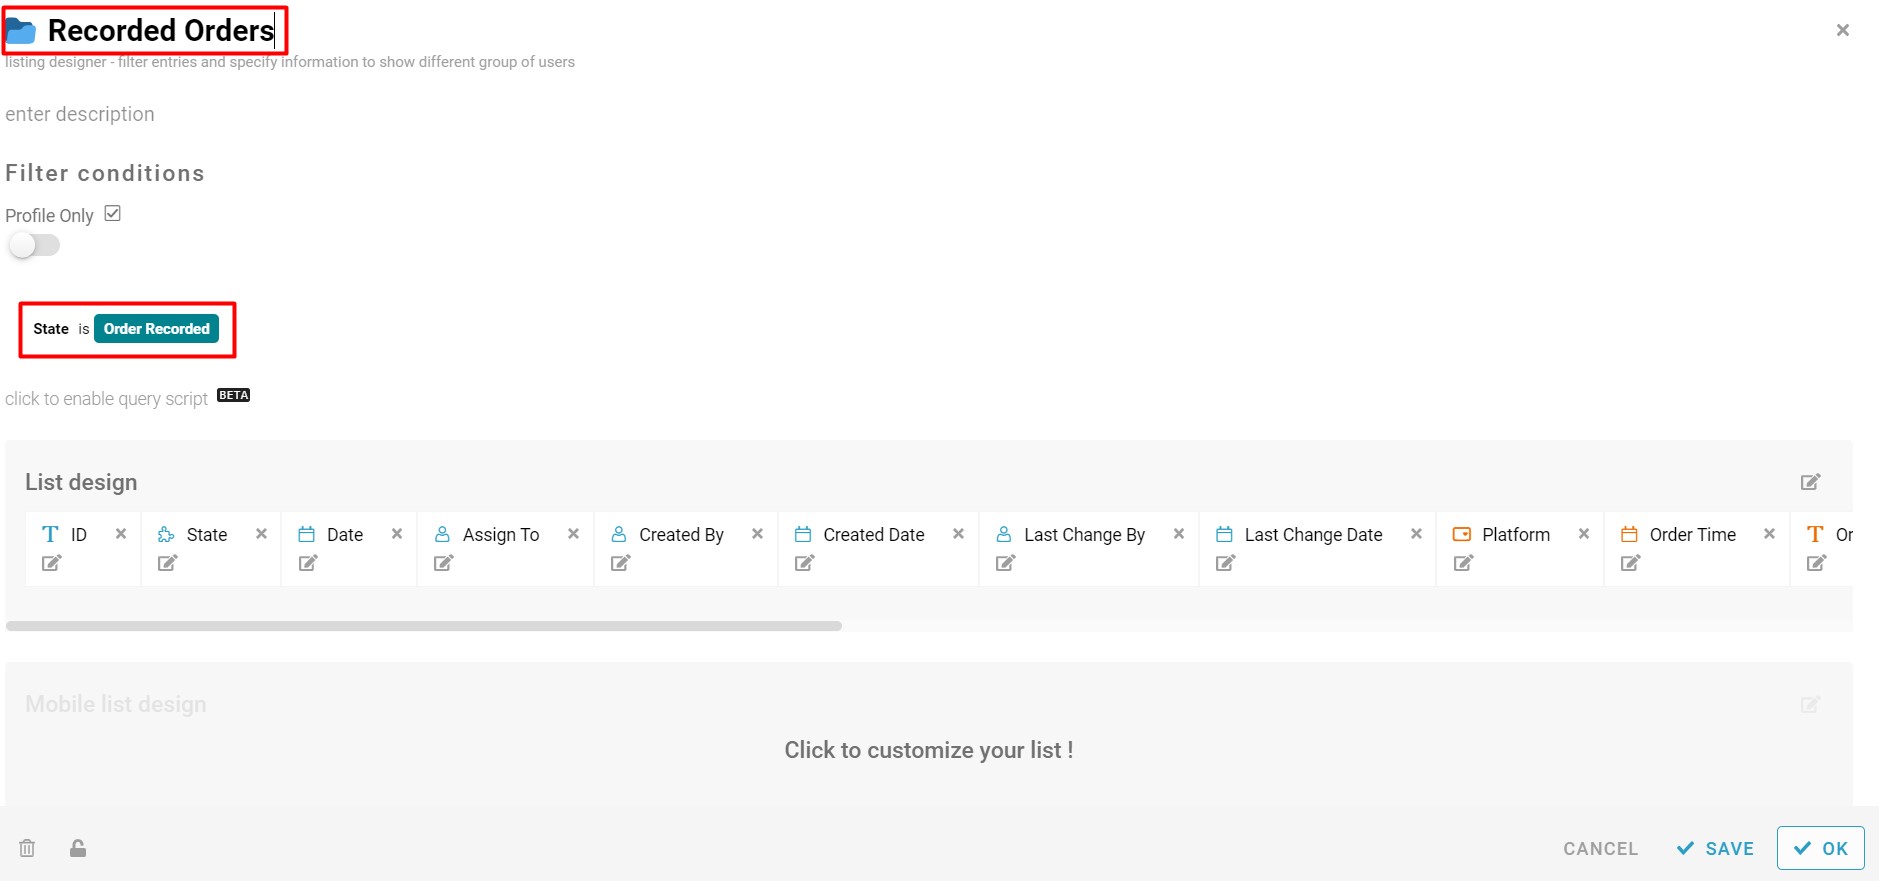
- Create all the Listing with filter condition, you may add and edit information to be displayed in the list of the entry using List design (Refer Picture 12 & Picture 13 & Picture 14):
- Orders
- Recorded Orders (Condition: State is Order Recorded)
- Orders Prepared (Condition: State is Order Prepared)
- Orders Shipped (Condition: State is Order Shipped)
- Orders Received by Buyer (Condition: State is Order Received by Buyer)
- Completed Orders (Condition: State is Completed Order)
- Orders Cancellation Request (Condition: State is Order Cancellation Request)
- Accepted Orders Cancellation (Condition: State is Order Cancellation Accepted)
- Refunded to Buyers (Condition: State is Refunded)
- Rejected Orders Cancellation (Condition: State is Order Cancellation Rejected)
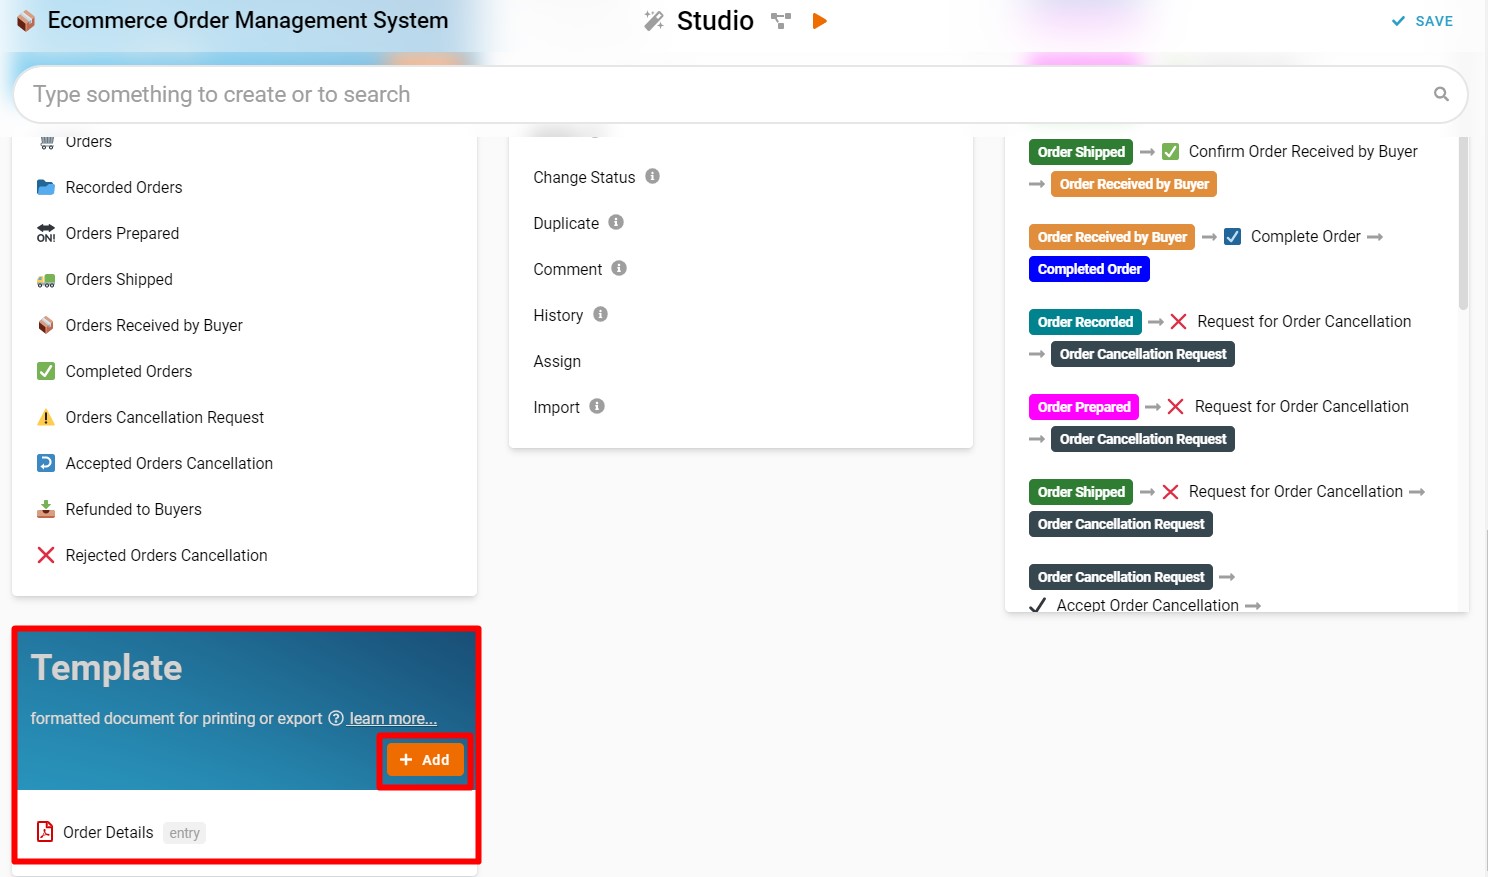
Template
- Create a formatted document for printing or export which is pdf format file that consists of order details in Template, drag and drop the information to design form (Refer Picture 15 & Picture 16).

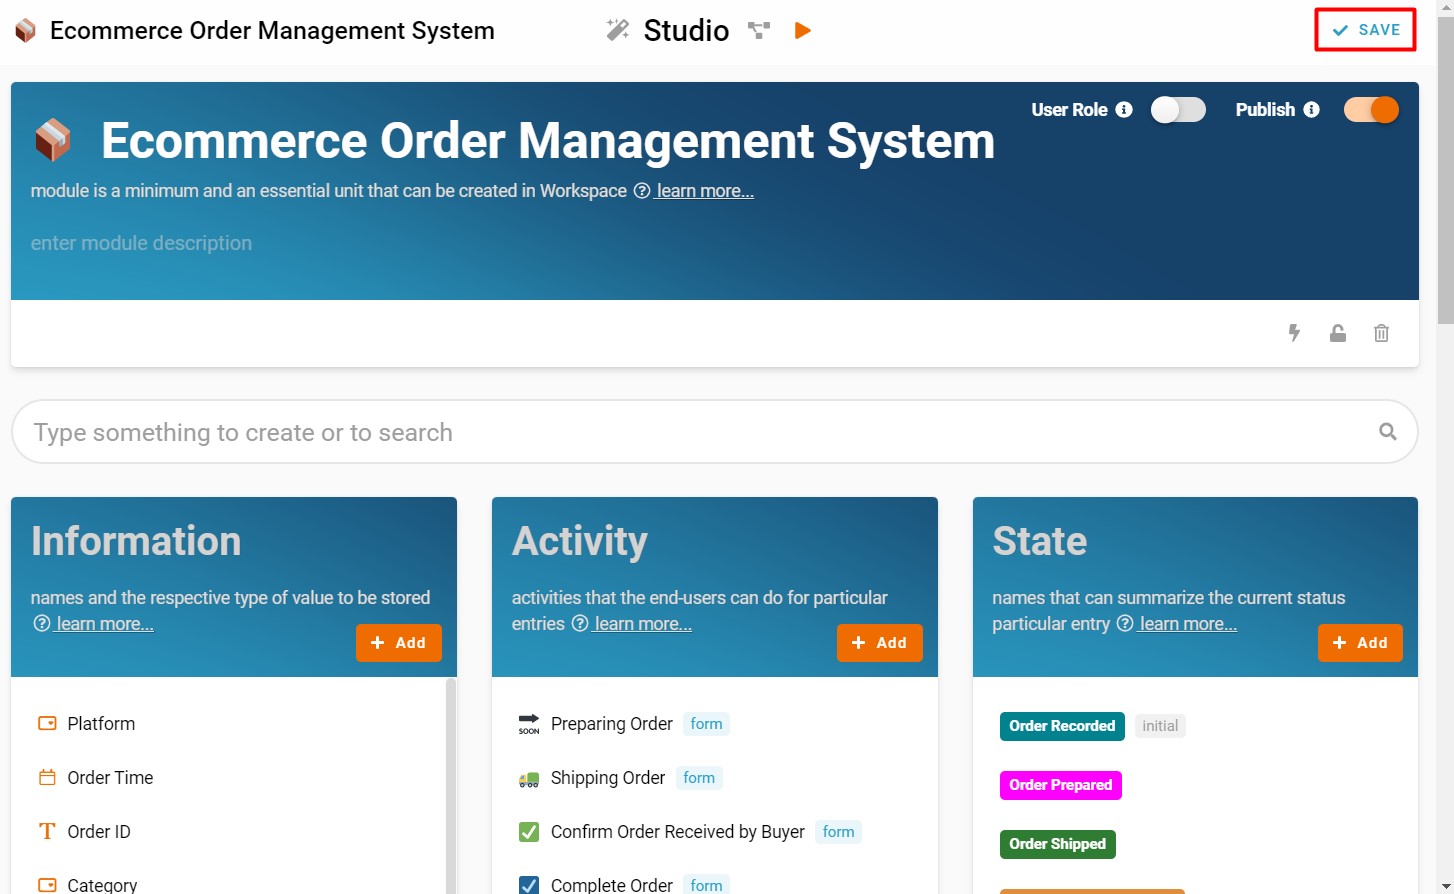
Save
- Click SAVE button at the top right to save all the configuration (Refer Picture 17).
Congratulations!!! You have successfully created eCommerce Order Management System.
For more templates:
Try FETIAS for FREE now.
Sign up at https://fetias.com
Related topic
Tutorial - eCommerce Order Management System